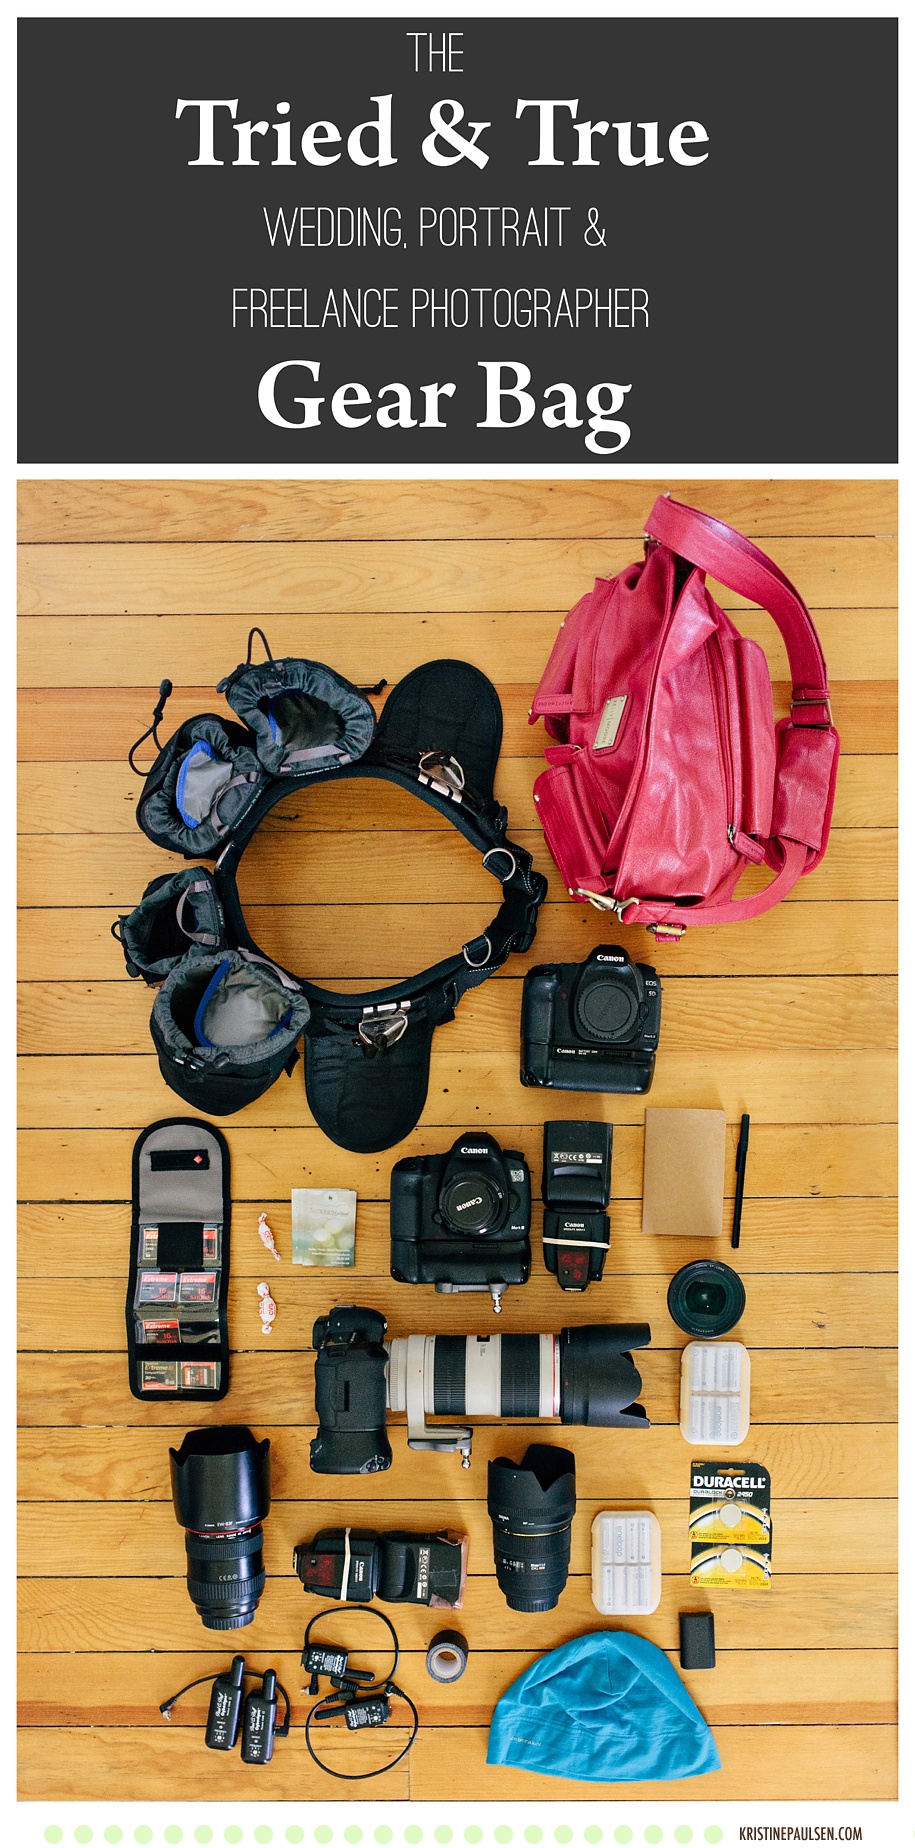
I’ve had many years to figure out what works for me in terms of photography gear and helps with my photo workflow – so I thought it might be handy to share some of the things that you can find in my camera bag and that I really love using and stand behind. The list will be continually evolving as I find different resources that are worth mentioning, so check back now and again!
Numero UNO in my Photography Gear Bag, So to Speak:
![]() MY BRAIN and my unique vision.
MY BRAIN and my unique vision.
I often have people come up to me and say, “Wow! You must take some great pictures with that *inserttypeofgearhere*.” And while, yes, it helps to have good equipment, the camera and the lenses and the light and the flashes aren’t going to do much for you if you don’t use your BRAIN first.
So, with that said, don’t forget that it’s the thing behind the camera that really makes the most difference. :) Try not to get caught up in the gear too much. It can be fun, but always be loyal to that good ol’ brain of yours.
Also keep in mind – the things you see here have taken me YEARS to acquire. I didn’t get all this stuff at once. I slowly added and replaced things as I could afford them. Do the best with what you have, and if you feel like it’s holding you back, then make a change and upgrade if you feel it’s necessary.
Ok. Off the soapbox. On to the gear.
(Keep scrolling below for detailed info on this gear as well as short-ish reviews of why I choose to use each thing you see here.)
Gear, from the top down, left to right: Think Tank belt with Think Tank pouches and Spider Pro holster adapters (and energy bar, not visible in photo), Kelly Moore photo bag, Canon 5d Mark ii backup (other backup not shown as I was using that to shoot the photo, along with the 40 mm pancake lens), CF cards and CF card organizer, cough drops (trust me – you do NOT want to be the person coughing up a lung during a wedding ceremony), business cards, Canon 5d Mark iii with grip and 50 mm lens, Canon speedlite, notebook and pen, Canon 5d mark iii with 70-200 lens, 20-35 lens, battery case with Eneloop batteries, 24-70 lens, Canon speedlite, 85 mm lens, more Eneloop batteries in a case, extra trigger batteries, extra camera battery, receivers and triggers, gaffers tape, and a hat (because you never know when it will be freezing in Montana).
My Photo Gear, in No Particular Order:
Si
gma 85mm f/1.4

, but, even though I love my L-glass, I adore Sigma’s version, red-banded or not.
Canon 70-200mm f/2.8L
– This is definitely one of my workhorse lenses, and one that always causes people’s jaws to drop because it’s a bit of a honkin’ beast. (Don’t worry – I don’t use it to garner that reaction, but it always elicits this which is kind of amusing…you should see what happens when you pull out a prime 300 or 400 mm lens – those things are gigantic, especially with the lens hoods on! … I digress.) Anyway…this is a zoom lens, so it’s a great tool for getting in close to the action without actually needing to be all up in it. That’s a great bonus for someone like me who photographs a lot of weddings and doesn’t want to disturb a moment, but still wants to capture it. LOVE this lens. Also a nice little lens for capturing sports images if you’re into that sort of a thing. It’s probably a little on the short side millimeter-wise for really stellar sports photography, but it’s an all-around fantastic lens.

– I tried the Sigma version of the 24-70, but it just didn’t cut it for me. So, here I am with the Canon L series 24-70, which I love. This lens is so essential to me – I love great wide shots, which this can provide (though it doesn’t get super wide at 24 mm), but it’s incredibly handy to have the option of zooming to 70 mm to compress your scene. This is a fantastic all-around lens – it’s wonderful for wedding work, as well as my photojournalism and editorial work, and because it’s a great Canon L-series, it’s fast. This lens and the 70-200 are pretty heavy, though. My hands kill me at the end of a long day from holding these guys up, but it’s worth it. Silver lining? My hands are in great shape!
Canon 50mm f/2.5 Macro
– This lens has been with me for a very long time, has gone through a repair, and still works great. It’s not an L-series lens, but it performs up to my standards. One of these days when I’ve got extra cash I’ll upgrade, but this has served me so well for so long, I don’t see the need. This little guy is a steal at $299.
Seriously. That’s ridiculously cheap for a lens that works as great as this one does. I love to use this for anything that could benefit from some macro work – rings, details, food, tiny birds – you name it, and it’s a nice normal lens for portraits, too. I don’t use it a ton for that, but it is the lens I usually have on my camera when I’m just shooting personal stuff. The downside to this lens, but really only very minor considering just how affordable it is, is that the autofocus is LOUD. Like really loud. And it can hunt around for focus sometimes, but I usually shoot with this in manual focus anyway, so it’s not an issue for me. A silver lining to that noise? If you have a small bird, as I do, that small bird my just decide that’s a noise he’d like to mimic. If you ask me, it’s pretty funny to hear a tiny bird making the sound of a loud lens.
Canon EF 20-35mm f/3.5-4.5
– When I need something a little wider than what my 24-70 can handle, I grab this lens. It’s nothing fancy and it’s not fast and has a variable aperture (which isn’t ideal because the aperture fluctuates as you zoom in and out and makes manual exposures slightly trickier), but usually when I’m using this lens, I like shooting around the 3.5-4.5 range anyway. AND, it has served me well for years and years and yeeeeeaaaaars. So it’s got street cred, and that should stand for something, right? Another benefit – because it’s not the top-o-the-line glass, it’s lighter. When I use this lens, I often use it towards the end of a long event, so that lightweight little thing on my camera suddenly becomes my new best friend and my hands promptly gain new energy. It’s a good thing. I’d be remiss if I didn’t mention, though, that my ultimate dream is to add that wonderfully gorgeous glass called the Canon EF 16-35mm f/2.8L
to my arsenal, but that will have to wait for the moment as, last I checked, I am not made of money. *sigh*
Canon 40mm f/2.8 “Pancake” lens
– This little guy is almost comical when you stick it onto a gigantic tricked out DSLR. It is teeeeeeensy! Hence the pancake moniker. But it’s a fun little lens, and another super affordable one at $149. I like to use this lens mostly for personal work when I don’t want to be lugging around something that draws too much attention. I took this with me when traveling through Costa Rica and Panama and using my Canon EOS M
, and it was a swell little companion. Plus, it’s fast! For that money, it’s another steal from Canon. (FYI: I returned the EOS M – it was a fantastic camera with a killer lens that came with it, but it was just shy of being perfect for me, so it needed to go to someone else who would love it more.)
Canon Speedlite 580EX II Flash
– I keep two of these around and have had them for years. They’re rugged and get banged around a lot since they usually stay on my cameras for the majority of the weddings and other events I shoot (because you never know when you’ll need to immediately light a situation), but they still work great. I also have the 580EX Flash, which is the older version and is nice to have around as well. Flashes are absolutely essential if you want to do any type of event work, especially weddings. They’re also great to have so you can be in control of the light, and not at the mercy of whatever natural light you have to work with. Working with flashes can sometimes seem daunting, but once you get the hang of it, you can do so much and have so much fun just playing with light.
Eneloop AA Rechargeable Batteries
– Flashes use batteries, as do a lot of other things, and I am loathe to use batteries that I have to toss after they’re drained, so I love Eneloop rechargeable batteries. I’ve been using these for years, and they’ve been awesome. Most of the time I can get through a wedding without having to swap for fresh ones. Just make sure you leave yourself plenty of time to charge as it can sometimes take a while, depending on how drained they are. I’d order yourself a bunch so you can always have extras (which is how I operate). It’s also a good idea to order a few extra chargers as well.
Extreme Pro 16 GB CompactFlash (CF) Card
– I have a gazillion of these…well…that’s an exaggeration, but I have a bunch of these that I always have on me while I’m shooting. I’ve always used SanDisk, but there are other good companies out there too. Make sure to get a card that has a write speed that is fast enough to handle the large files that cameras are putting out now, otherwise you’ll be stuck with a camera that can’t shoot because it’s still writing data to your card. Treat your cards well and they should last a long time. However, if you suspect any sort of damage or corruption, suck it up and toss the card. It’s not worth it to lose someone’s images because you couldn’t handle throwing a bad card away. Also, be sure to label your cards with your name and phone number in case of loss (the horrors!!!), and also label it with the date of purchase. Cards do get old, so it’s nice to know when you need to send them out to pasture.
Canon EOS 5D Mark III
– I recently upgraded to the Mark III, and am so happy I did for many reasons, but here are the main ones: 1) I love my 5D Mark II
as well (and keep it as backup gear), but the Mark III improved the focal points (enormously). And 2) The fact that I can record images to two different CF cards AT THE SAME TIME, effectively backing up my images as I shoot, is just beyond great. For anyone shooting weddings, that’s definitely a feature to look for in a camera. I seriously cannot emphasize just how much I dig that. There’s a ton more I could write about this camera, but suffice it to say that I was more than happy with my upgrade. I know there are a lot of Mark III haters out there, but for my purposes, I’m glad I made the change and it works great for what I do. I also appreciate that the file sizes, while large, are not ridiculously inflated. I think that’s where things might be headed in future camera models, but I just don’t believe gigantic, bloated files are warranted unless you’re printing large format (like billboards). And even then, you don’t need those large files. I’ve had billboards printed from my original 5d files. But I digress. Short story – it’s a great, full-frame camera. (I was spoiled with film in my early days of shooting, so I’m not sure I could happily use a camera that wasn’t full-frame.)
Vello BG-C9 Battery Grip
– One thing I’m super conscious of when shooting is just how rough it can be on your body (there’s a reason wedding photographers call the day after a wedding a “hangover day” – it’s not because we were drinking – that’s important to note!, but it’s because we work our bodies and minds so hard that we feel like we’ve been flattened by a semi-truck – that’s no exaggeration). With that in mind, I don’t want to have back and neck and allover body problems when I’m older, so I do my best to be as ergonomic as possible while working. Enter the battery grip! This is for my Mark III and, though I preferred the grip for the 5D Mark II over this one, mostly because I liked the battery load better, this one still works great. What on earth is a grip, you ask? Basically, it offers you several different features: this one has room for an extra lithium battery (which is always nice), and, the reason I use grips – you can shoot vertically with it because it has a vertical grip on the side. Instead of getting all wonky and non-ergonomic with your arm and elbow, you simply just turn the camera, and put your hand on the new grip. It’s got shutter button, a back-button-focus option (which I swear by) and a fantastic little joystick to adjust your focus point – the whole shebang. LOVE it. Plus, it’s not too outrageously expensive, and is certainly cheaper than the Canon version. And I haven’t had any issues with it being off-brand. One thing – yes, it does add weight to your overall setup, but seriously, it’s so much better in the long run. Do your body a favor and get yourself a grip.
SpiderHolster SpiderPro
– Speaking of treating yourself well, I swear by, SWEAR BY, the Spider Holster system. This has been one of the best things to happen to my photography in a long time. Holy moly, get rid of those dang neck straps! Save yourself and your body and switch up to this type of a system. Prior to this, I had been using a BlackRapid Double Slim
harness (because I always shoot with two camera bodies), which worked well and was still much better than those dang neck straps, but when I gave the Sider Holster system a try, this was a hands down winner in terms of ergonomics. I don’t use anything else but this now. This has seriously got to be one of the best inventions EVER, and here are a few reasons why. Cameras weigh a lot. It’s seriously unhealthy to be putting that much strain on your back and neck and in such weird, awkward positions. The Spider Pro holster setup brilliantly removes all that weight from around your neck and distributes it down onto your hips. Have you ever gone backpacking before? The weight of the pack isn’t on your back, right? It’s mostly on your hips. The Spider Pro holsters do the same. Now, I chose to use a different belt than the one SpiderPro sells, because I felt like I’d probably need more padding to make it comfortable during long event coverage. So I opted for the Think Tank belt
, (which I’ll talk about in a second). The nice thing about SpiderPro is that they make adapter kits, which you can then fit onto a different belt, which is exactly what I did. To use the holsters, they function exactly how you might think they would. You attach a plate to the base of you camera, which then slides in and out of the holsters easily. The pads protect the sides of your body (I got a LOT of bruises from my cameras swinging around when I was using the Black Rapid system), and you have a safe and secure place for your cameras when you’re not using them – and they’re not around your flipping neck!! The holsters also lock, so you don’t have to worry about your camera taking a leap and committing hari-kari in some unfortunate way. Yes, once you’re holding the camera, you don’t have the backup of a strap, but I tell you – this is a million times better. It’s also a great conversation starter, because yes – you do look like a gunslinger when using those holsters. If you are image conscious, as I was initially, just get over it. Your body will thank you. I’ll do a more in depth review of this system soon – I love it that much. SO much admiration for the folks over at SpiderPro.
Think Tank Steroid Speed Belt
– As I
 mentioned above – this whole belt setup is incredible. I chose the Think Tank belt over the belt that Spider Pro puts out, mainly because I knew I’d probably want the extra padding on the Steroid belt. I haven’t tried the alternative to the thicker belt, but I’m glad I made that choice – it’s SO nice to have extra padding to keep everything comfortable. Because yes – it can be a lot of weight resting on your hips. I also like to add lens bags to the belt, too, which I’ll get to next. This particular belt is a beast – it is built to stay closed and built to last. I trust it implicitly and don’t ever fear that it’s going to loosen or open unexpectedly. The only issue I’ve had with this belt and pouch setup is that it does increase your footprint – i.e. you’ve suddenly got massive hips! However, I adjusted to this pretty quickly since it wasn’t that much of a difference from having the cameras at my side with the Black Rapid setup. You just have to be aware of the space you take up and might have to get a little creative squeezing through small spaces at receptions. But I’ve never had it be more than a minor, minor issue. Such great setup – love it.
Think Tank Lens Changer 35
– I’ve added these Think Tank pouches to my belt to hold the lenses I most use. While Think Tank does offer more than one size of pouch, I’ve found that it’s handier to have larger pouches rather than smaller ones, since I can easily swap lenses between all pouches, instead of assigning lenses to certain sized pouches, if that makes sense. The other great thing about these pouches is that they have bungee tops, to keep your lenses inside if you happen to be army crawling around like I do sometimes, AND, they all include rain covers that you can easily pop on if the weather starts to act up. I use three of those pouches and then squeeze in the Think Tank R U Hot? Water Bottle Pouch
to hold my CF card organizer, cough drops, business cards, and energy bars (or water bottle if I want, though I usually keep that in the Kelly Moore bag, which I talk more about below).
Vanguard Alta Pro 264AB 100 Aluminum Tripod – I had been using a terrible cheapo tripod for years because I don’t like to spend money when I don’t have to, but I finally, finally upgraded to a snazzier tripod, and let me tell you – if you’re spending money on a camera and lens, please spend the money on a decent tripod on which to place it. Otherwise you’re just risking the whole thing tipping over and breaking that expensive camera and lens (and your heart). This Vanguard badboy is so much better, and much more stable, and the one I got boasts a ball head, which basically means you’ve got a very easily-adjustable way to move your camera around. This model also allows you to swing the center column out so it’s parallel to the floor (or you can adjust the angle as needed). I particularly love that feature for getting great shots from overhead.
Kelly Moore 2 Sues Camera/Tablet Bag – This is a nice, chic bag to carry extra gear around that I don’t necessarily always need on my ThinkTank belt. I like to put my flashes in here when I’m don’t need them, as well as my light triggers, my water bottle, extra batteries
, gaffer’s tape
, (always have tape with you!), business cards, notepad and pens, a few extra memory cards, my car keys, cough drops, etc. You can really pack a lot in here. This bag might be a little heavy to constantly have on you when it’s fully loaded, but for me, since I usually just set it down and move it only when I’m moving locations, it’s great for all those extra small things. (Mine is the raspberry color.)
Computer and Internet Goodies:
 I currently use Bluehost as my website host (for all my websites actually – I self-host) and have been for years – and there’s a reason for that. They do a fantastic job, they’re super affordable, and you can pretty much call and talk to a real person 24/7. The people you do end up talking to are knowledgeable, friendly and do a great job helping you work through whatever kink you may be experiencing. I believe they’re based out of Utah, and sometimes when I call and they find out I’m in Montana, we’ll randomly end up talking about skiing (if there’s a little downtime for researching my issue, etc.). Maybe I’m silly, but I like being able to have a real conversation with people and not just have a tech problem be a transaction. They definitely get my vote. Great company – I can’t recommend them enough.
Adobe Creative Cloud
– I would be lying if I said I didn’t go kicking and screaming to sign up for the Creative Cloud with Adobe. I just dislike subscription services in general, but…I took the plunge, all the while gnashing my teeth and pulling out my hair, but I’ve got to admit. It’s not that bad. I still dislike subscription services, but it’s nice to have access to all the latest updates of programs, and for me, I choose to have access to ALL the programs. Which is really pretty sweet. I still gnash my teeth and pull my hair a little bit, but this isn’t as bad as I originally thought. However, if you don’t want to sign up for the whole kit and kaboodle, you could always just do a Photoshop/Lightroom creative cloud subscription
, and that would be pretty great too.
Wacom Intuos5 Touch Small
– Along similar lines from up above regarding ergonomics, I am infinitely glad I switched from a regular mouse for my editing to this awesome pen/touch editing tablet. I actually got rid of my mouse as I no longer use one, since I use the Wacom for all my computing needs now. It does take a little while to get used to, but once you learn it, you’ll never want to go back to that brick-like thing you once used. Plus, your hands, wrists and fingers won’t hurt like they once did using a traditional mouse (at least my aches and pains cleared up completely when I switched to this!).
G-Technology G-DOCK ev 2TB External Drives
– Photo files nowadays are pretty large, so you’re likely going to want to store them somewhere other than your computer’s hard drive. I’ve been using G-Tech for years and love their products. They’re fantastic quality and rarely fail. However, it’s good to keep in mind that all hard drives will fail. It’s just the nature of the beast, so back up your work, always and forever! That said, I trust G-Tech drives way more than the old Western Digital drives I used to use (you will never catch me using those again – so many ghost drives from WD – ugh). This new ev setup from G-Tech is pretty sweet too – the drives are super small, portable and very easy to use. I’ve got 6 or so of these guys and have all my images archived on them. I highly recommend this company. But…don’t forget to back up your photos! Speaking of which…
![]() CrashPlan – What good is it to spend so much time and energy making all these photos if they all get lost because you didn’t back them up? Not a whole lot. People – back up your work! Back it up, back it up again, and back it up once more. You seriously cannot be overzealous about this. In addition to backing up images on G-Tech drives, I also upload all my work (plus other non photo-related files) to Crashplan, which is an online backup solution. Trust me, you will want to use some sort of online cloud for your files. I used to use Backblaze, and while that was a great backup solution for a while, it ended up not being ideal for me because images that weren’t connected to the server for 30 or 60 days (I can’t *quite* remember the length) would be seen as no longer needed and then deleted from your backup. That didn’t sit well with me since it’s just not feasible to have a gazillion hard drives plugged in all the time. CrashPlan does not delete files if your hard drives are not connected. So, switch I did, and I’m perfectly happy with the change and the service.
CrashPlan – What good is it to spend so much time and energy making all these photos if they all get lost because you didn’t back them up? Not a whole lot. People – back up your work! Back it up, back it up again, and back it up once more. You seriously cannot be overzealous about this. In addition to backing up images on G-Tech drives, I also upload all my work (plus other non photo-related files) to Crashplan, which is an online backup solution. Trust me, you will want to use some sort of online cloud for your files. I used to use Backblaze, and while that was a great backup solution for a while, it ended up not being ideal for me because images that weren’t connected to the server for 30 or 60 days (I can’t *quite* remember the length) would be seen as no longer needed and then deleted from your backup. That didn’t sit well with me since it’s just not feasible to have a gazillion hard drives plugged in all the time. CrashPlan does not delete files if your hard drives are not connected. So, switch I did, and I’m perfectly happy with the change and the service.
VARIDESK Pro Adjustable Standing Desk
– So, as photographers, we tend to do a lot of editing which means we’re staring at a screen a lot of the time, which also means, traditionally, we’re sitting. A LOT. That’s just not healthy. I had been eyeing a standing desk for a long time, but didn’t want to have to buy a whole new desk just to have the ability to work like this. That’s when I heard about VariDesk. Yes, I probably could have built my own setup, and a lot of people do, but I wanted to have the option to switch between sitting and standing and do it easily. This is such a nifty contraption – it sits on top of your existing desk and you simply press a few levers and you can adjust it up or down in a jiffy. It was a little challenging to stand so much at first, but I found that once I got used to standing, anytime I had to sit for prolonged periods of time was actually quite painful. Now I feel more awake, more alert, my back and neck don’t kill me after a long editing session, and I’m just overall happier to edit when I’m standing. Plus, it makes dancing at your desk extra fun. I’m a huge fan of the standing desk.
